How It's Made: 3D Printed Fridge Magnets
As part of a group effort at MakeIt Labs to create objects featuring Nashua landmarks for a local scavenger hunt, I designed these 3D printed fridge magnets:
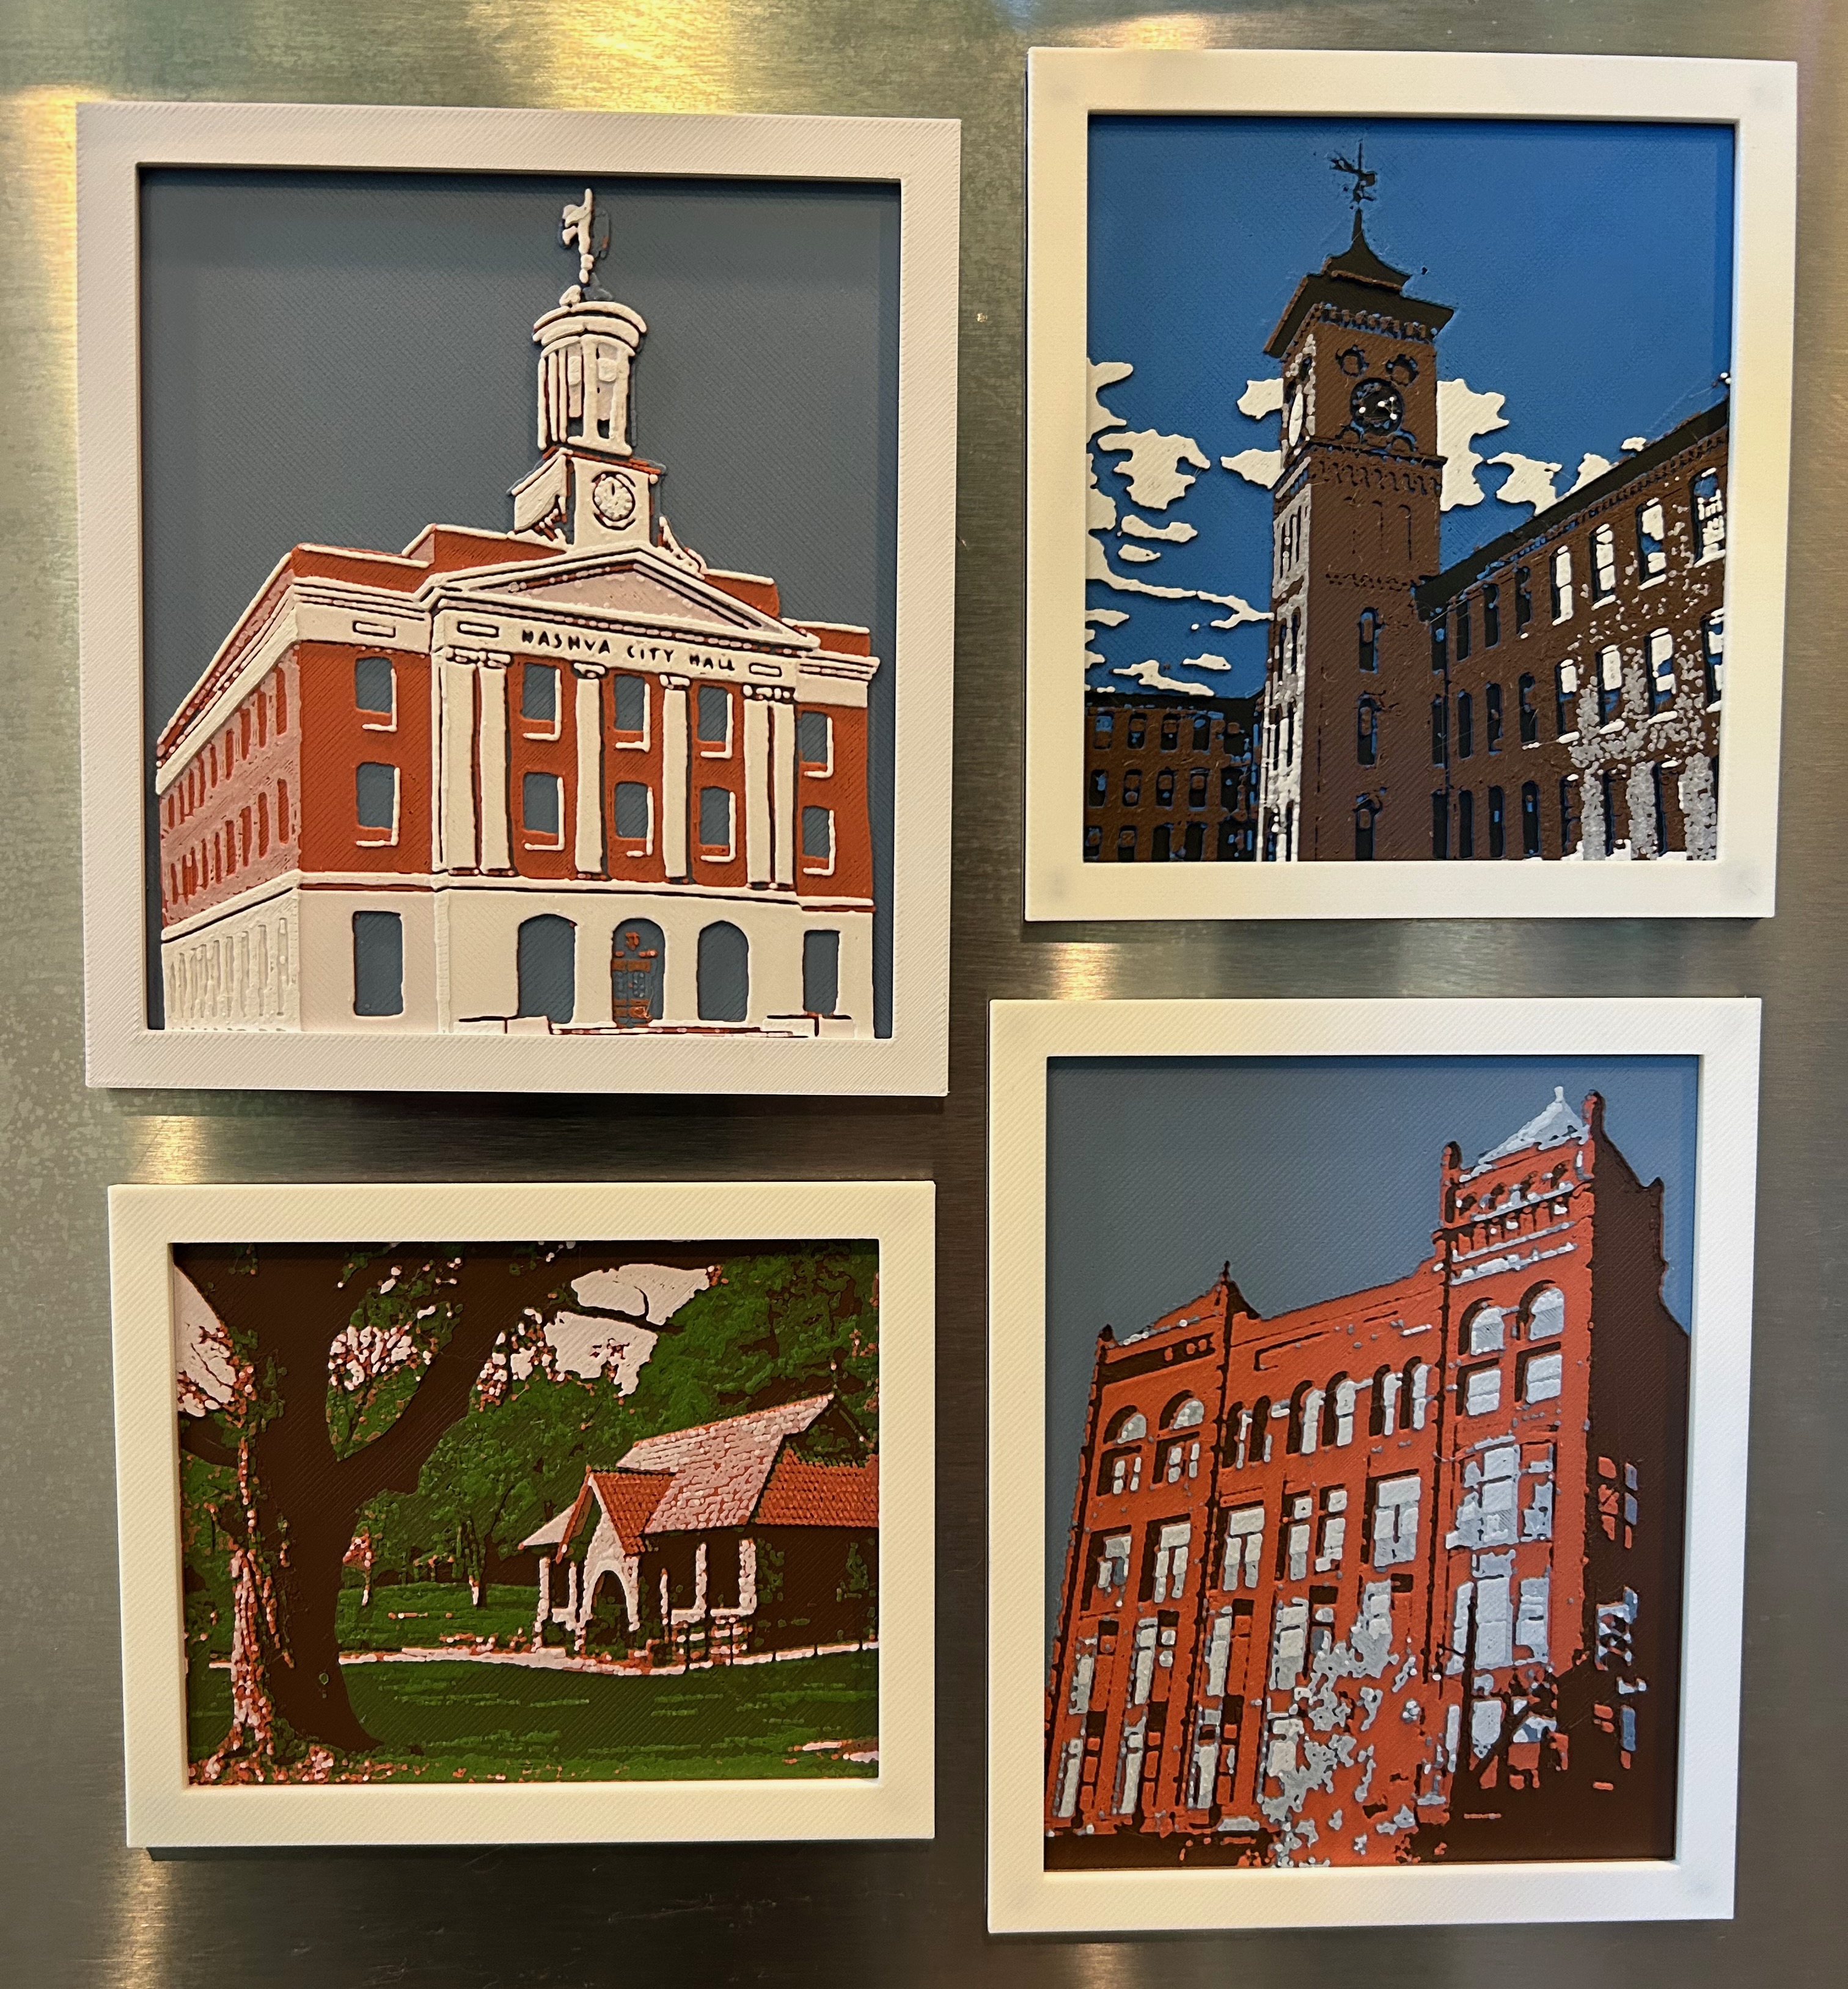
In this post, I’ll be sharing the behind-the-scenes of how we made these magnets.
If you’re new to 3D printing: it works by melting plastic filament and depositing it layer by layer to build up a solid object. While these prints only have 4 different filament colors each, layering slightly transparent filament colors at various thicknesses allows for blending between colors.
I had limited experience with 3D modelling and printing going into this project, so I hope to make this more approachable for beginners.
Also, I want to showcase this project as a great example of what’s possible at MakeIt Labs - both in terms of equipment available and community support. If you’re interested in learning more about MakeIt Labs, be sure to come to MakeIt Fest on Saturday June 13th 2026 or swing by any Thursday night at 6pm for open house!
The Goal
The goal of this project was to create many small objects highlighting Nashua’s local landmarks. I enjoy featuring local subjects in my paintings to try to draw attention to the places around us, so this felt like a great opportunity to bring that to a new medium.
3D printing objects provided the opportunity to easily batch-produce and integrate the design into a practical form factor, such as a fridge magnet. The 3D printers we have at MakeIt Labs support up to 4 colors, so we could do some multicolor prints to get more pop.
To handle the translation from image to print file, we used Hueforge, a software that maps an image onto a set of colored filaments within a print file.
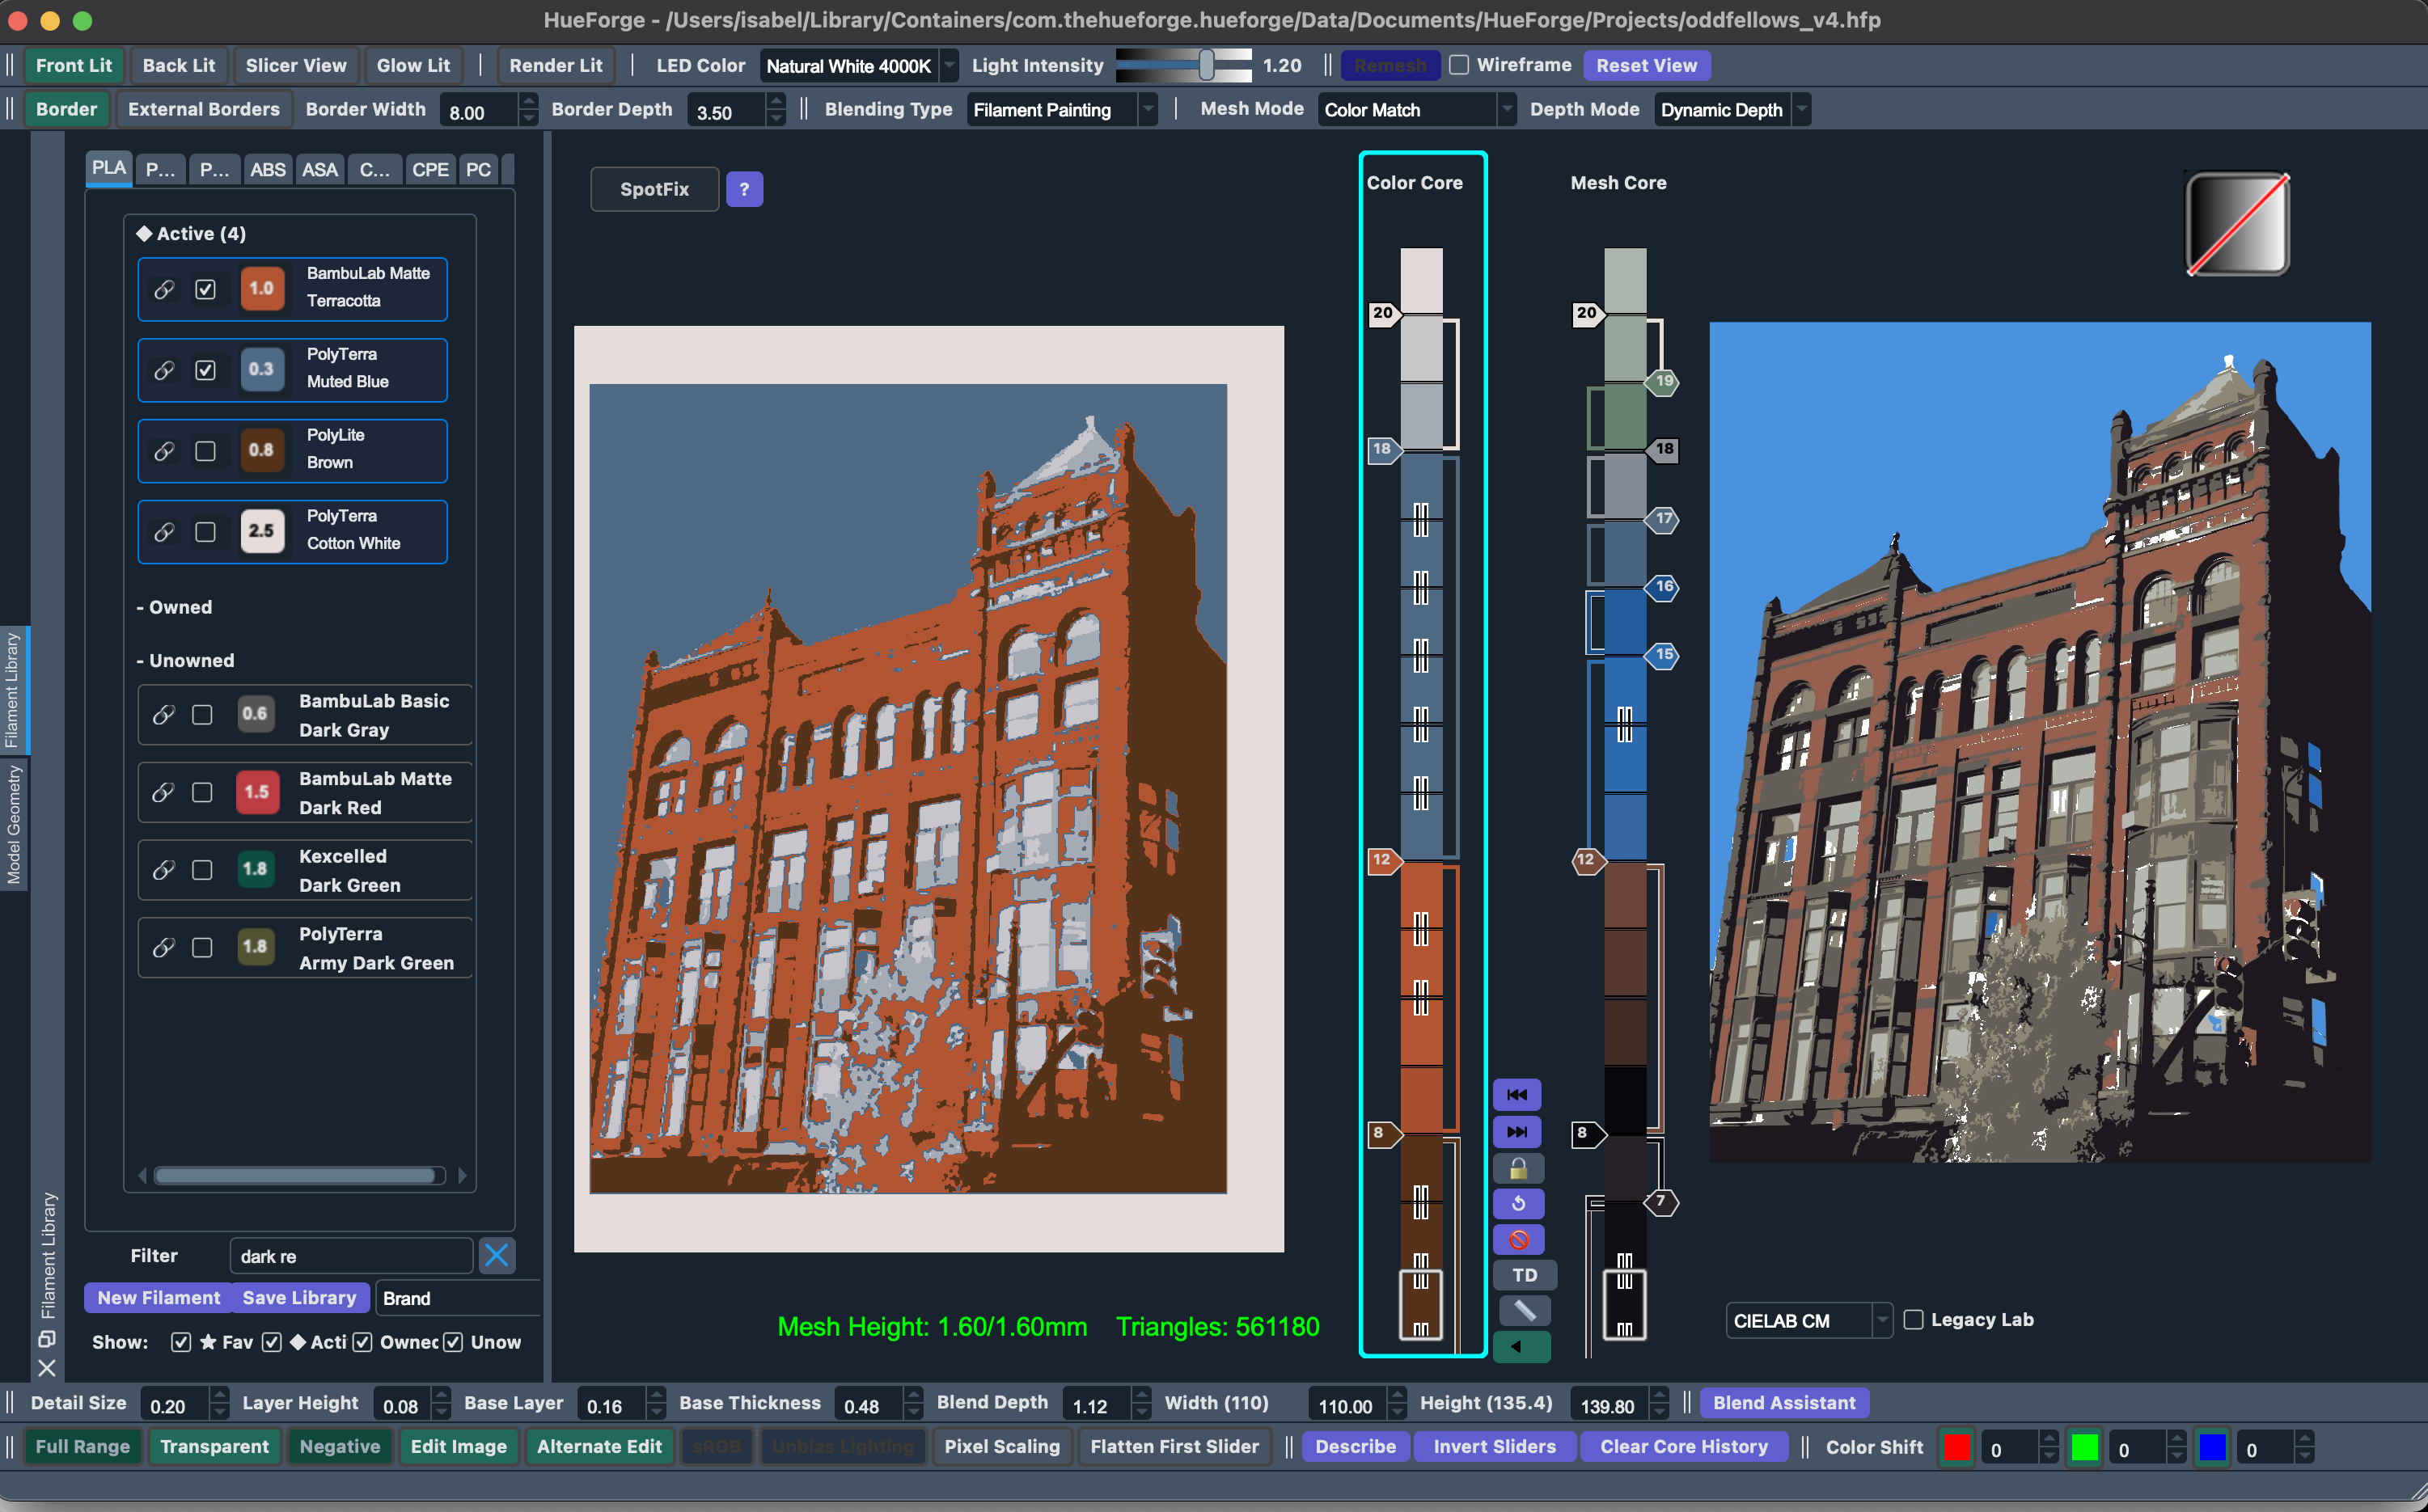
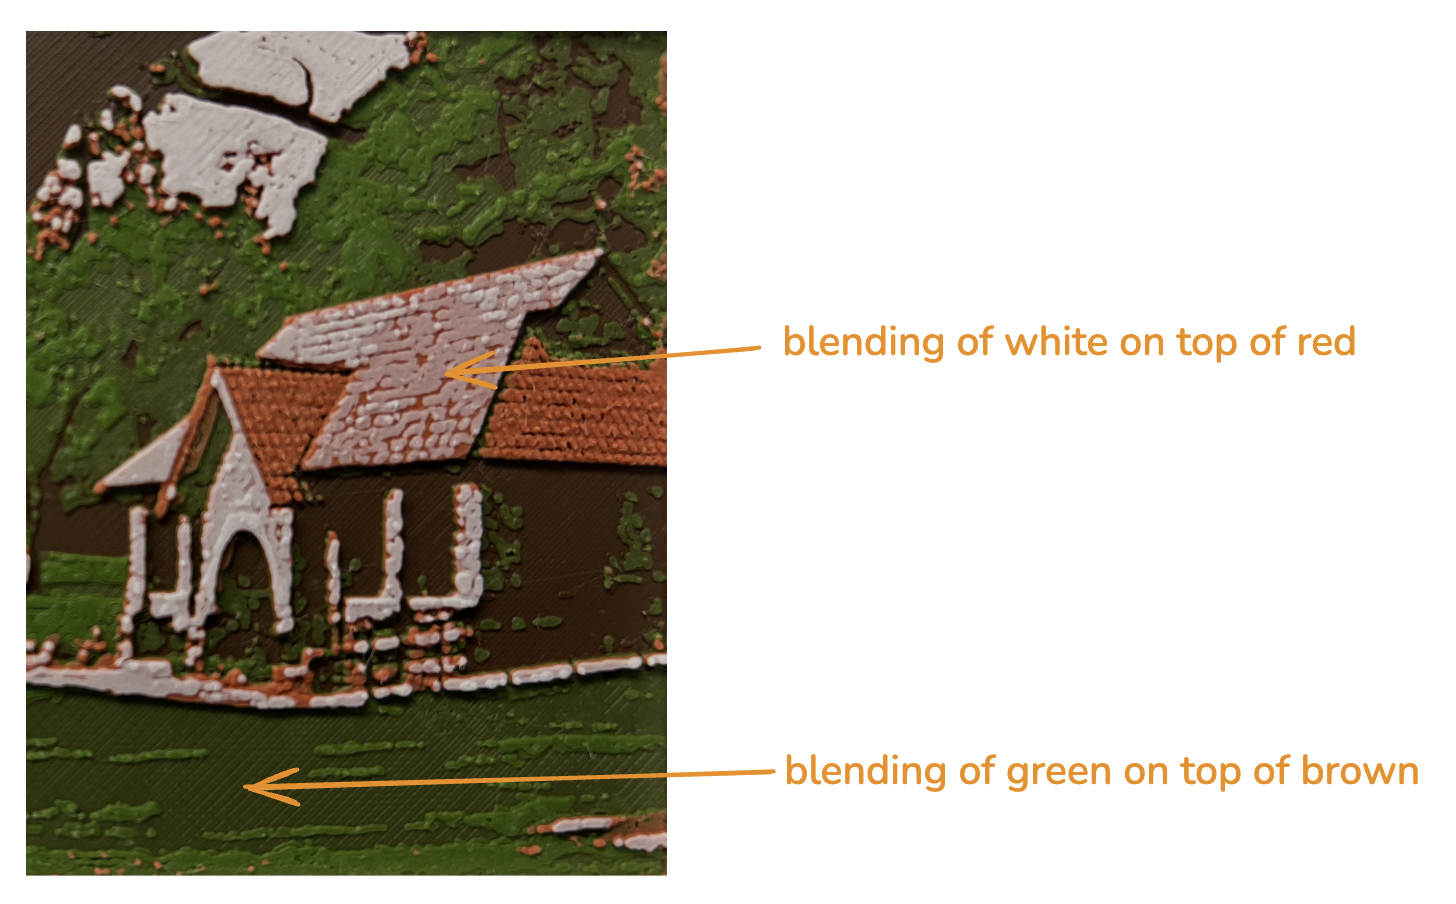
It works by varying the thickness of each color’s layers across the print: thicker layers make a color more opaque and dominant, while thinner layers let the color beneath show through. This way, Hueforge can achieve gradients and shading across 4 colors through layer blending, rather than needing a separate filament for every shade.
For example, below you can see a gradient between the brown and green filaments in the areas where green has fewer layers.
At a high level, the steps were:
- Choose a good reference image and simplify
- Use Hueforge to convert image into a 3D print file
- Slice and print
- Laser engrave backs
Step 1: Choose a good reference image and simplify
Since we were doing relatively small prints (less than 5×5 inches), it was important to choose images that read well even at low resolution. I was looking for large, distinct areas of light and dark across a range of colors — fine detail gets lost at this scale. Images with busy textures, low contrast between areas, or too many similarly-valued tones tend to come out muddy.
I also wanted the print colors to be somewhat realistic rather than going for a black-and-white or grayscale-plus-one-color approach. That meant thinking carefully about which images could work with just four colors that also span the value scale to create contrast.
How I simplified each image varied by print.
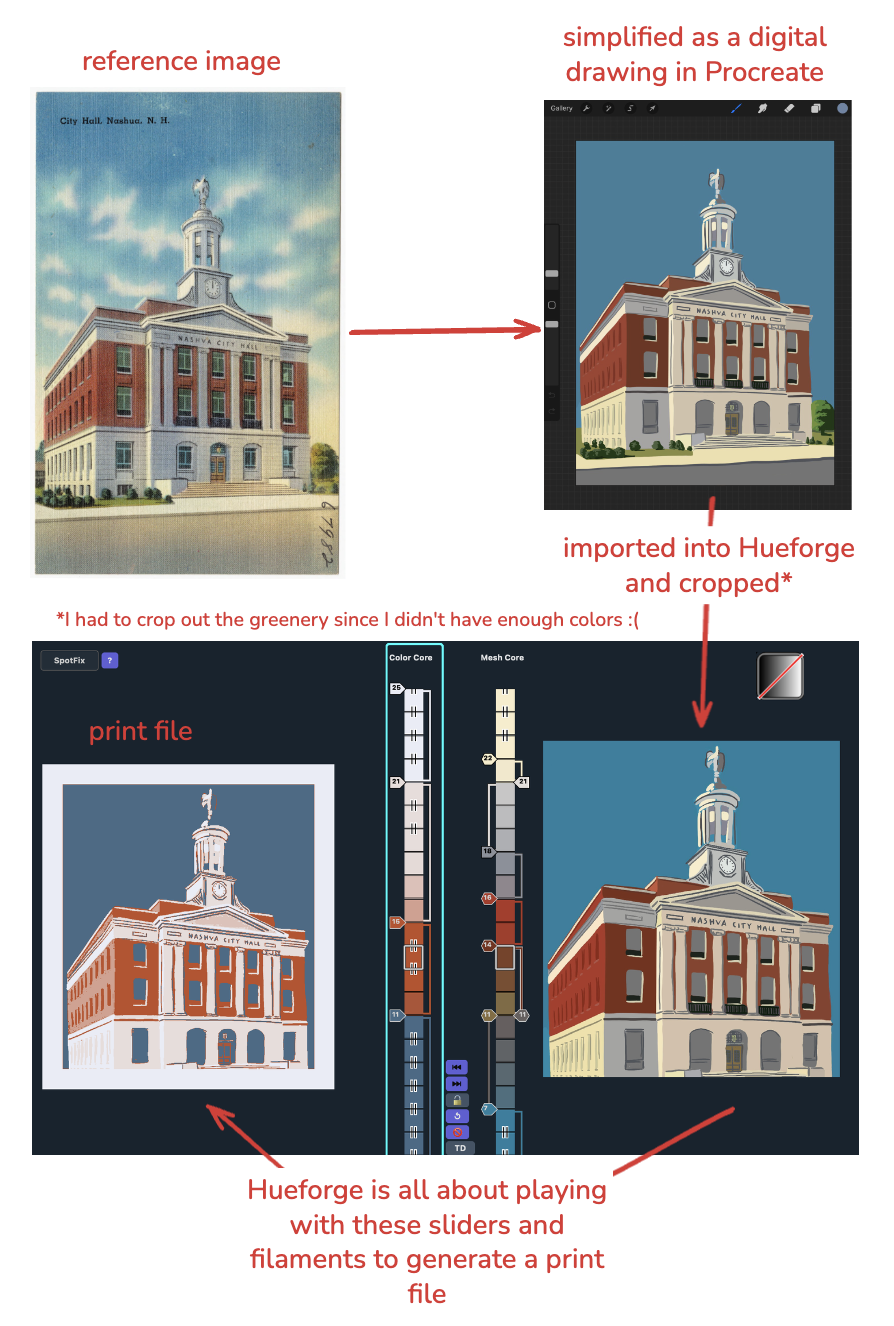
For City Hall, I used Procreate on my iPad to do a digital drawing based on a vintage Nashua postcard. This gave me the most control over which features and colors came through in the final result.
For the other prints, I mostly used image processing, with some touchup in Procreate. Specifically, I used Inkscape’s “Trace Bitmap” feature, which converts a pixel-based image into a vector file. The multicolor trace option reduces the image down to a set number of colors, collapsing similar tones into broader flat planes — and those clean, flat planes are exactly what HueForge works well with. Feeding a noisy photo directly into HueForge can cause it to pick up compression artifacts as features, so simplifying first makes a real difference.

For the trace, I’d try a few different color counts and also played around with other settings to remove details. I almost always used more colors than I had filaments — since the filaments blend, you’re effectively getting more shades anyway — and found 8 colors to be a good starting point.
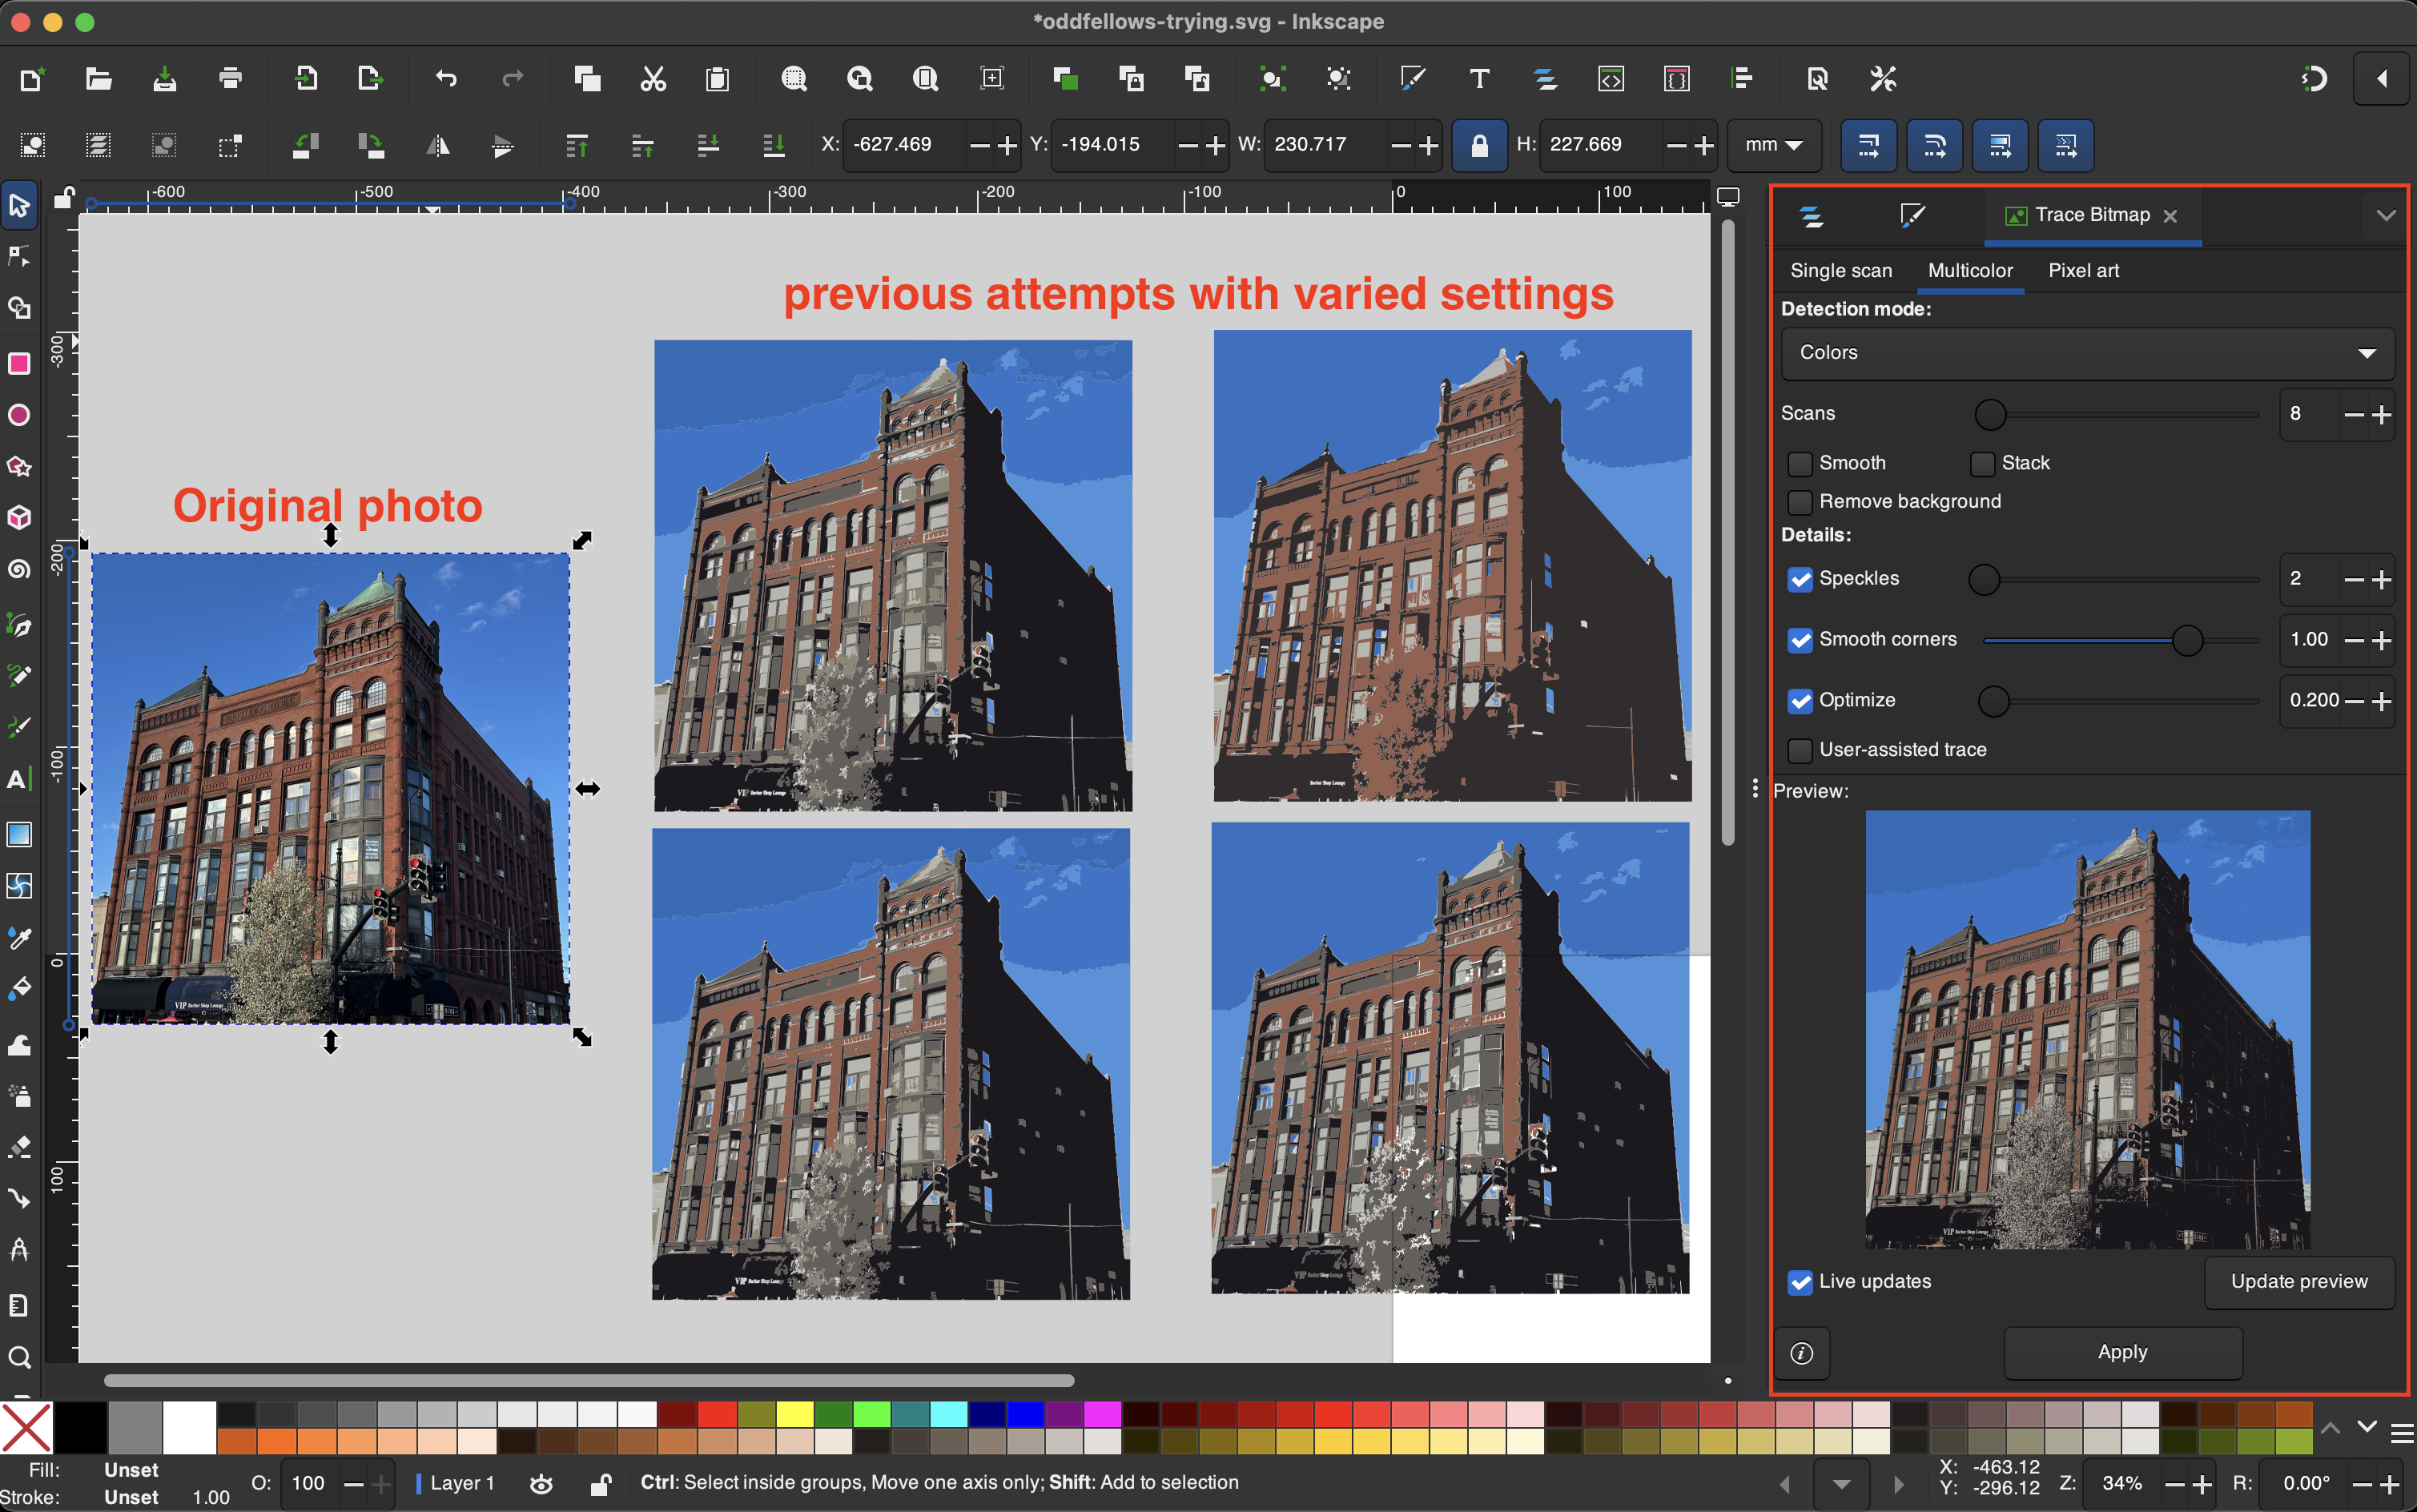
During touch-up in Procreate, I would remove any unnecessary details and combine colors further — for example, collapsing the entire sky into a single blue color.
Step 2: Use Hueforge to convert image into a 3D print file
HueForge is powerful but has a real learning curve. You can buy a lifetime license for $24 on their site. The software was built by a solo developer - and it shows - so the documentation isn’t the most comprehensive or beginner-friendly. I’d recommend skipping the tutorials linked from the official site, since many are from an older version with a different UI and fewer modes. Instead, I found the 3D Prints by Vic YouTube channel really helpful, and his beginner HueForge playlist is a great starting point.
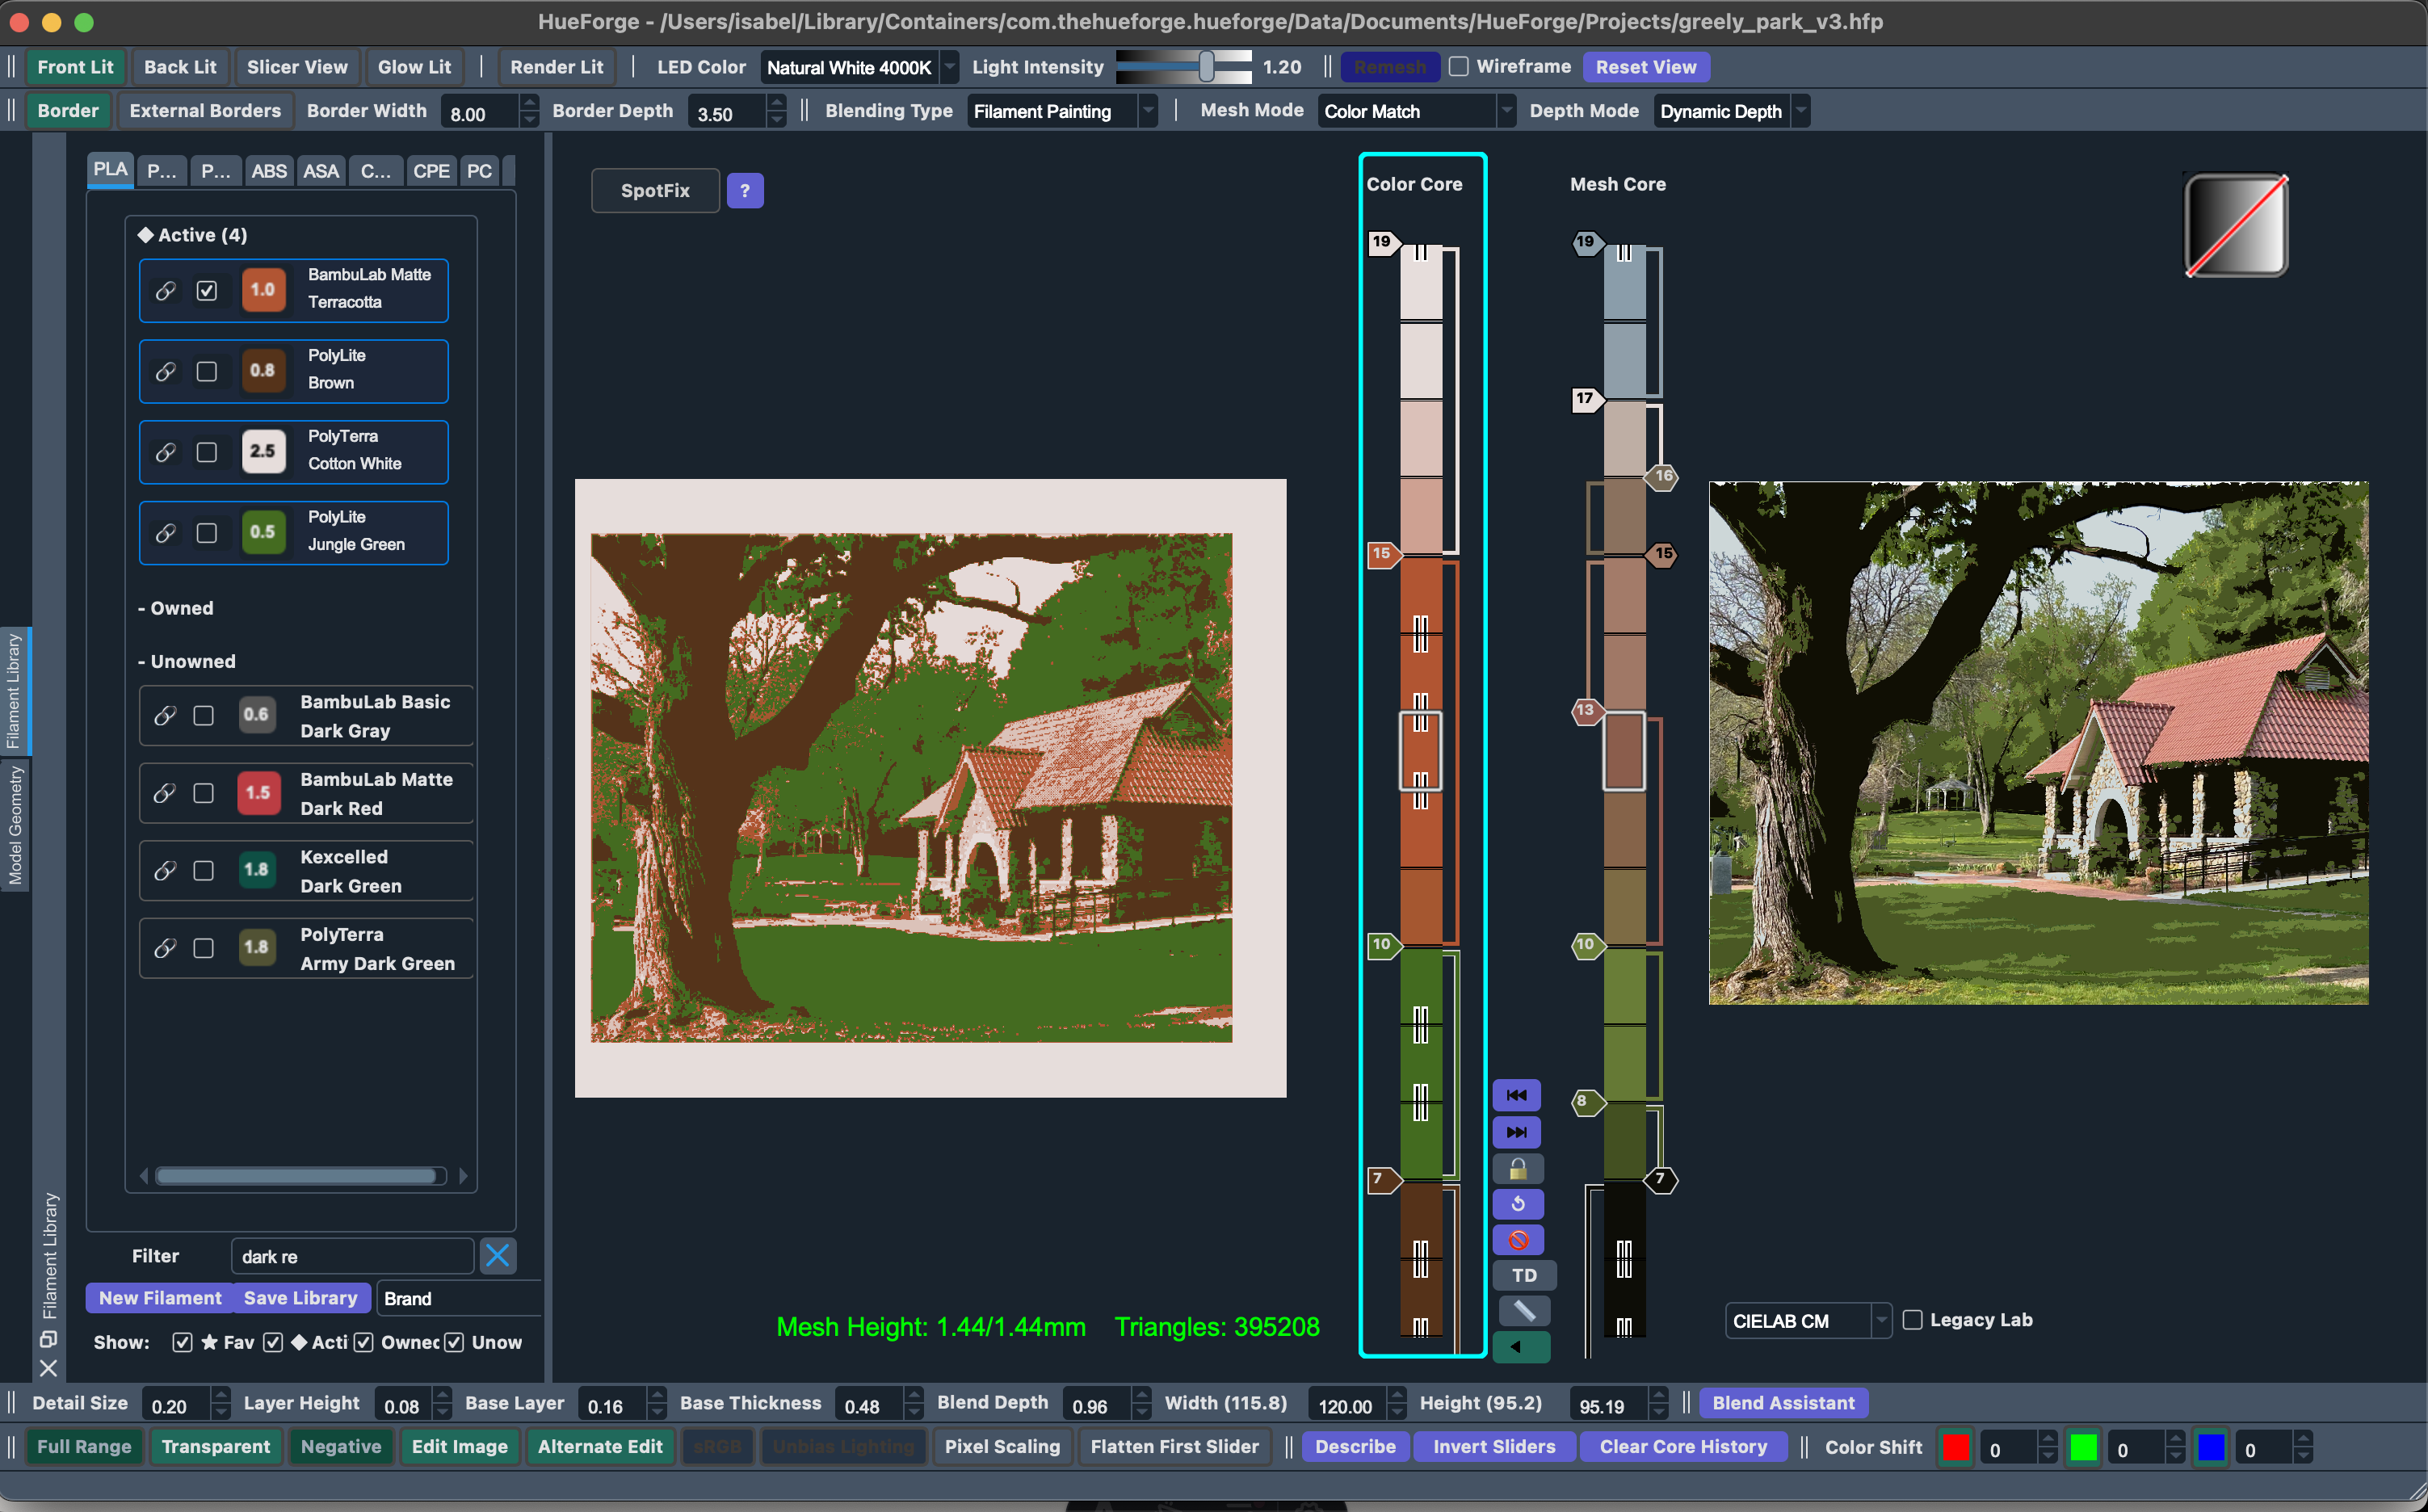
One thing to get familiar with early is the mode, which controls how colors in your image get mapped to filaments. Most modes map image brightness to filament layers regardless of hue, which works well for black-and-white or grayscale-plus-accent style prints. But since I wanted colors that were more true to life, I used color match mode, where HueForge tries to match the actual colors in your image to your filaments for a more realistic result.
I also added a frame (a flat border around the design) to all of my prints for rigidity and a more finished look — this is straightforward to do directly in HueForge.
Once you’re happy with the filament mapping, HueForge exports an STL file, which you then bring into your 3D printing slicer software.
Step 3: Slice and print
At MakeIt Labs we mostly use Bambu printers, which use Bambu Studio as the slicer software. A slicer takes the generic STL file from HueForge and translates it into specific instructions for your printer model and settings. It also provides some basic editing tools — for example, this is where I added magnet holes to the back of each print by subtracting a negative shape from the body.

3D printing isn’t always the most reliable operation. Warping is a common issue with flat prints, and we did have some failures, especially as we scaled up to printing multiple prints at a time. It took some iteration to tweak the printer settings and improve our success rate.
Step 4: Laser engrave backs
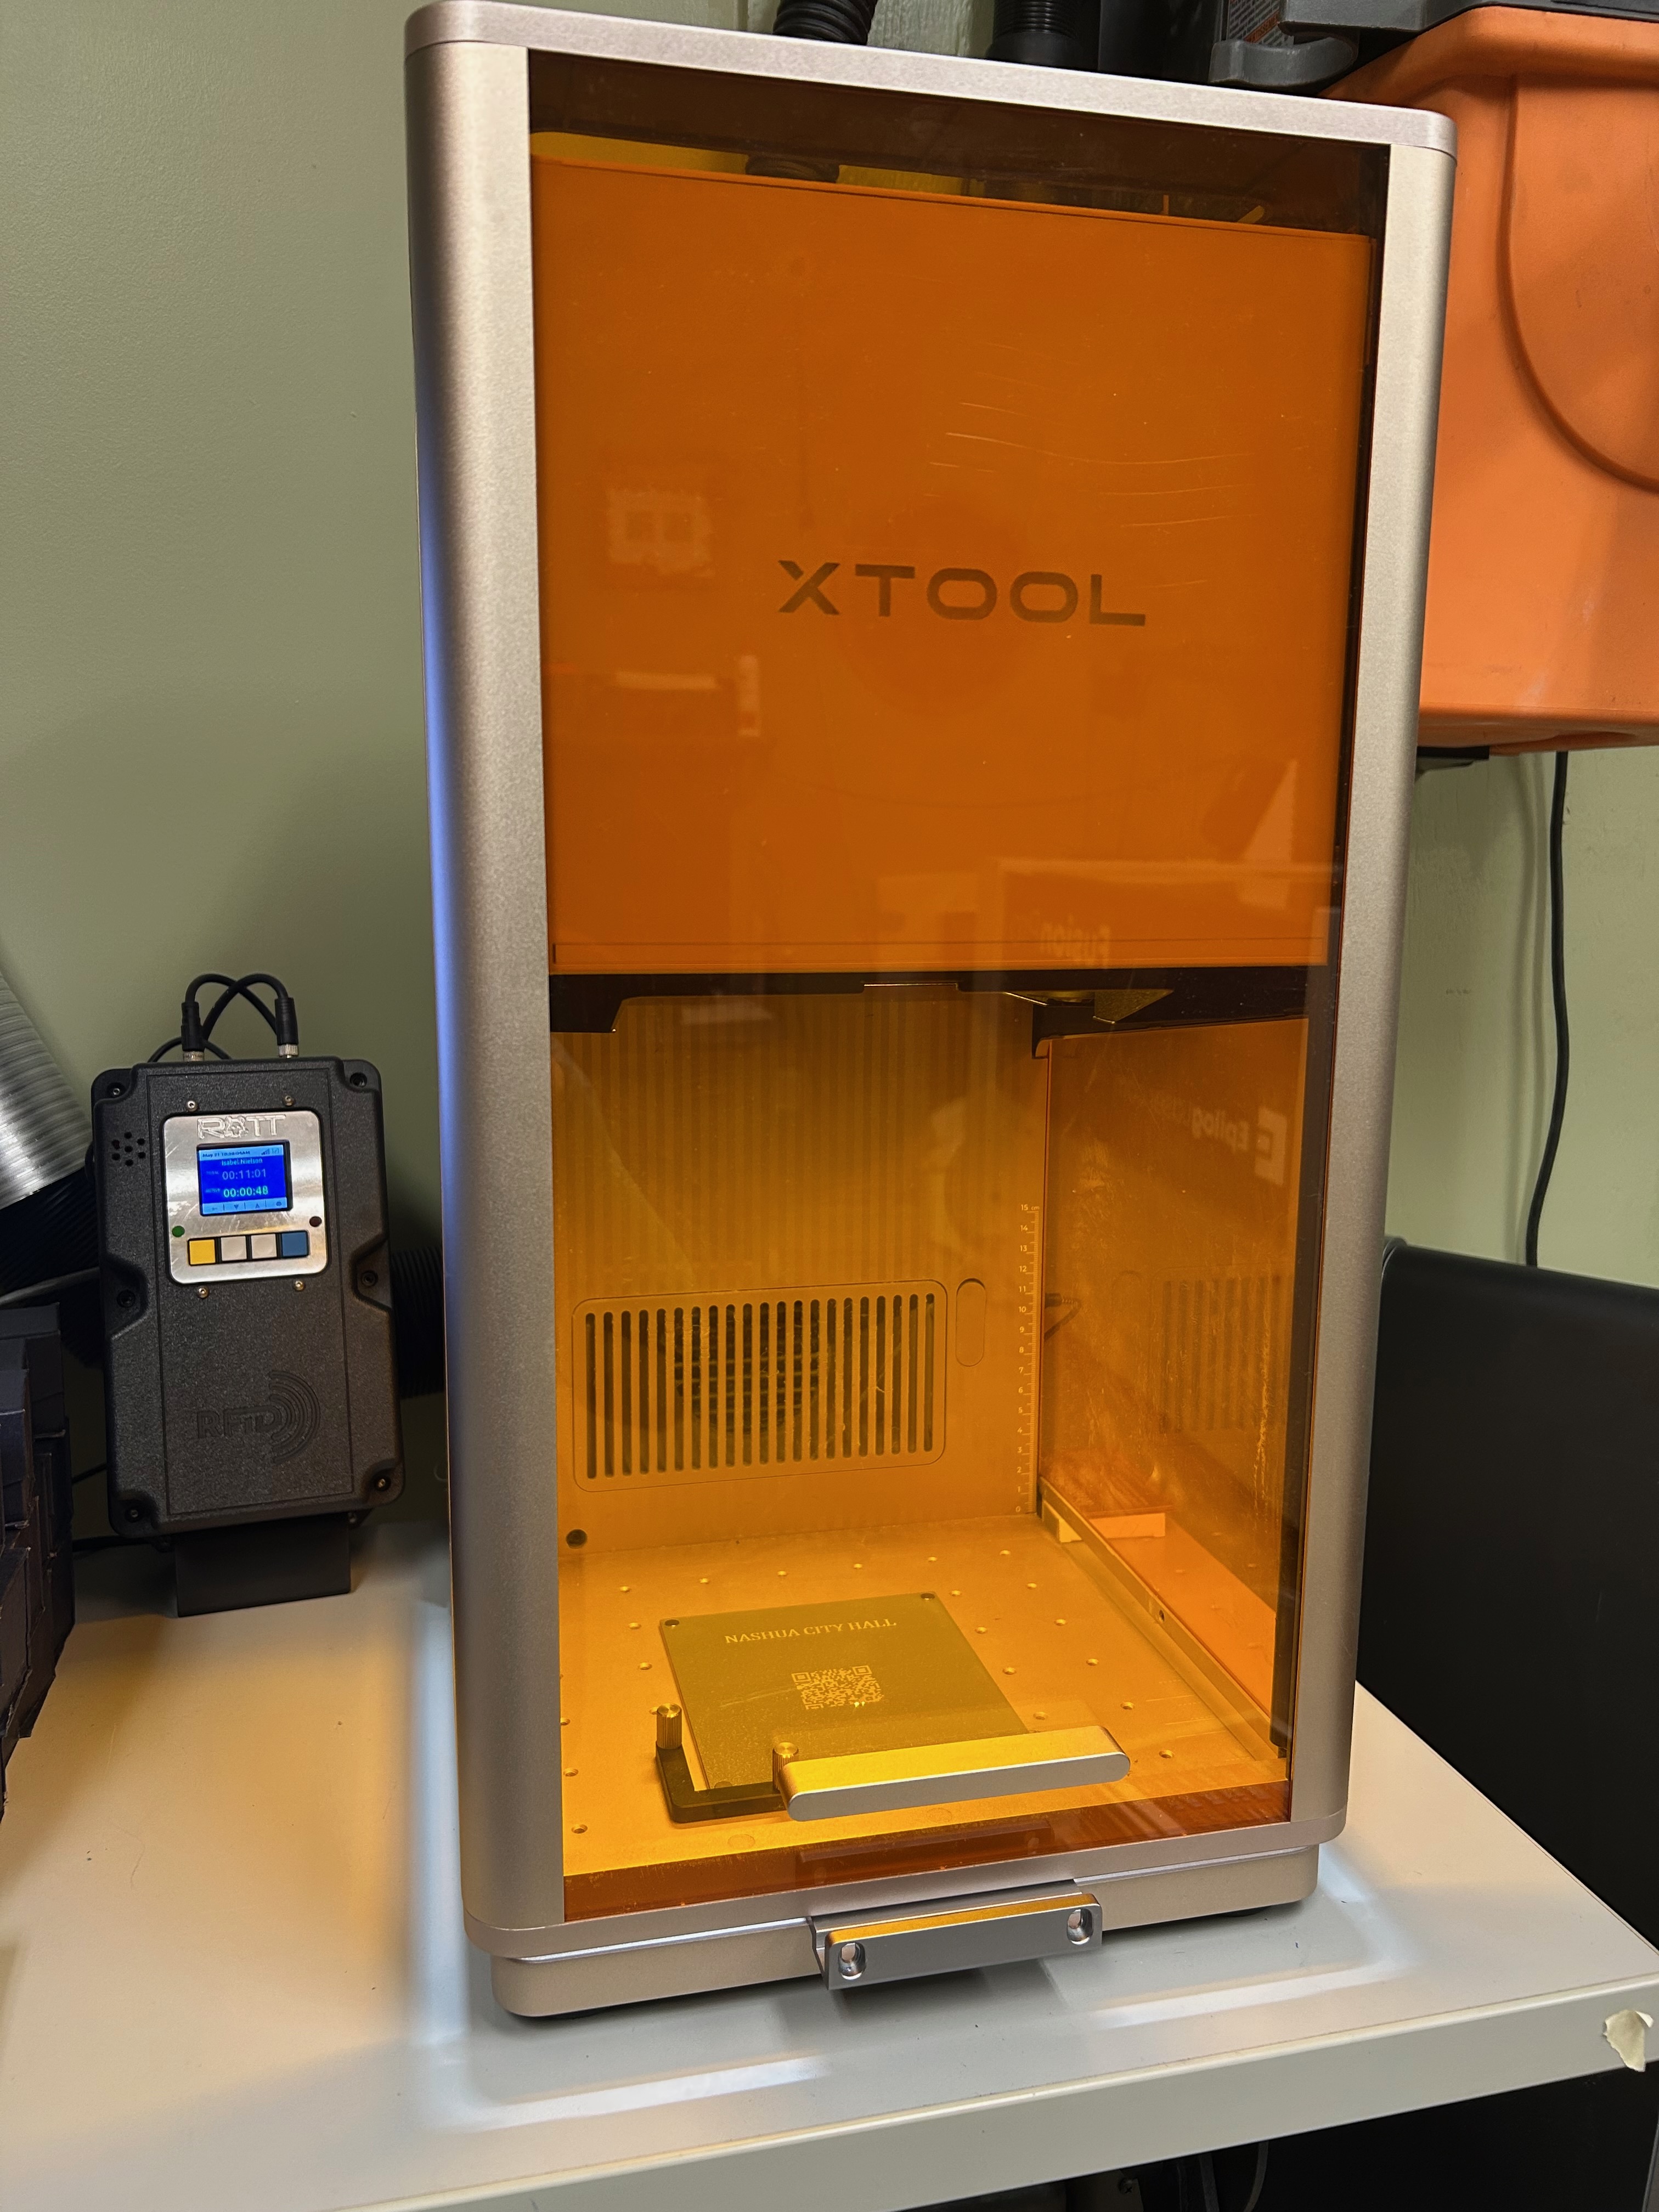
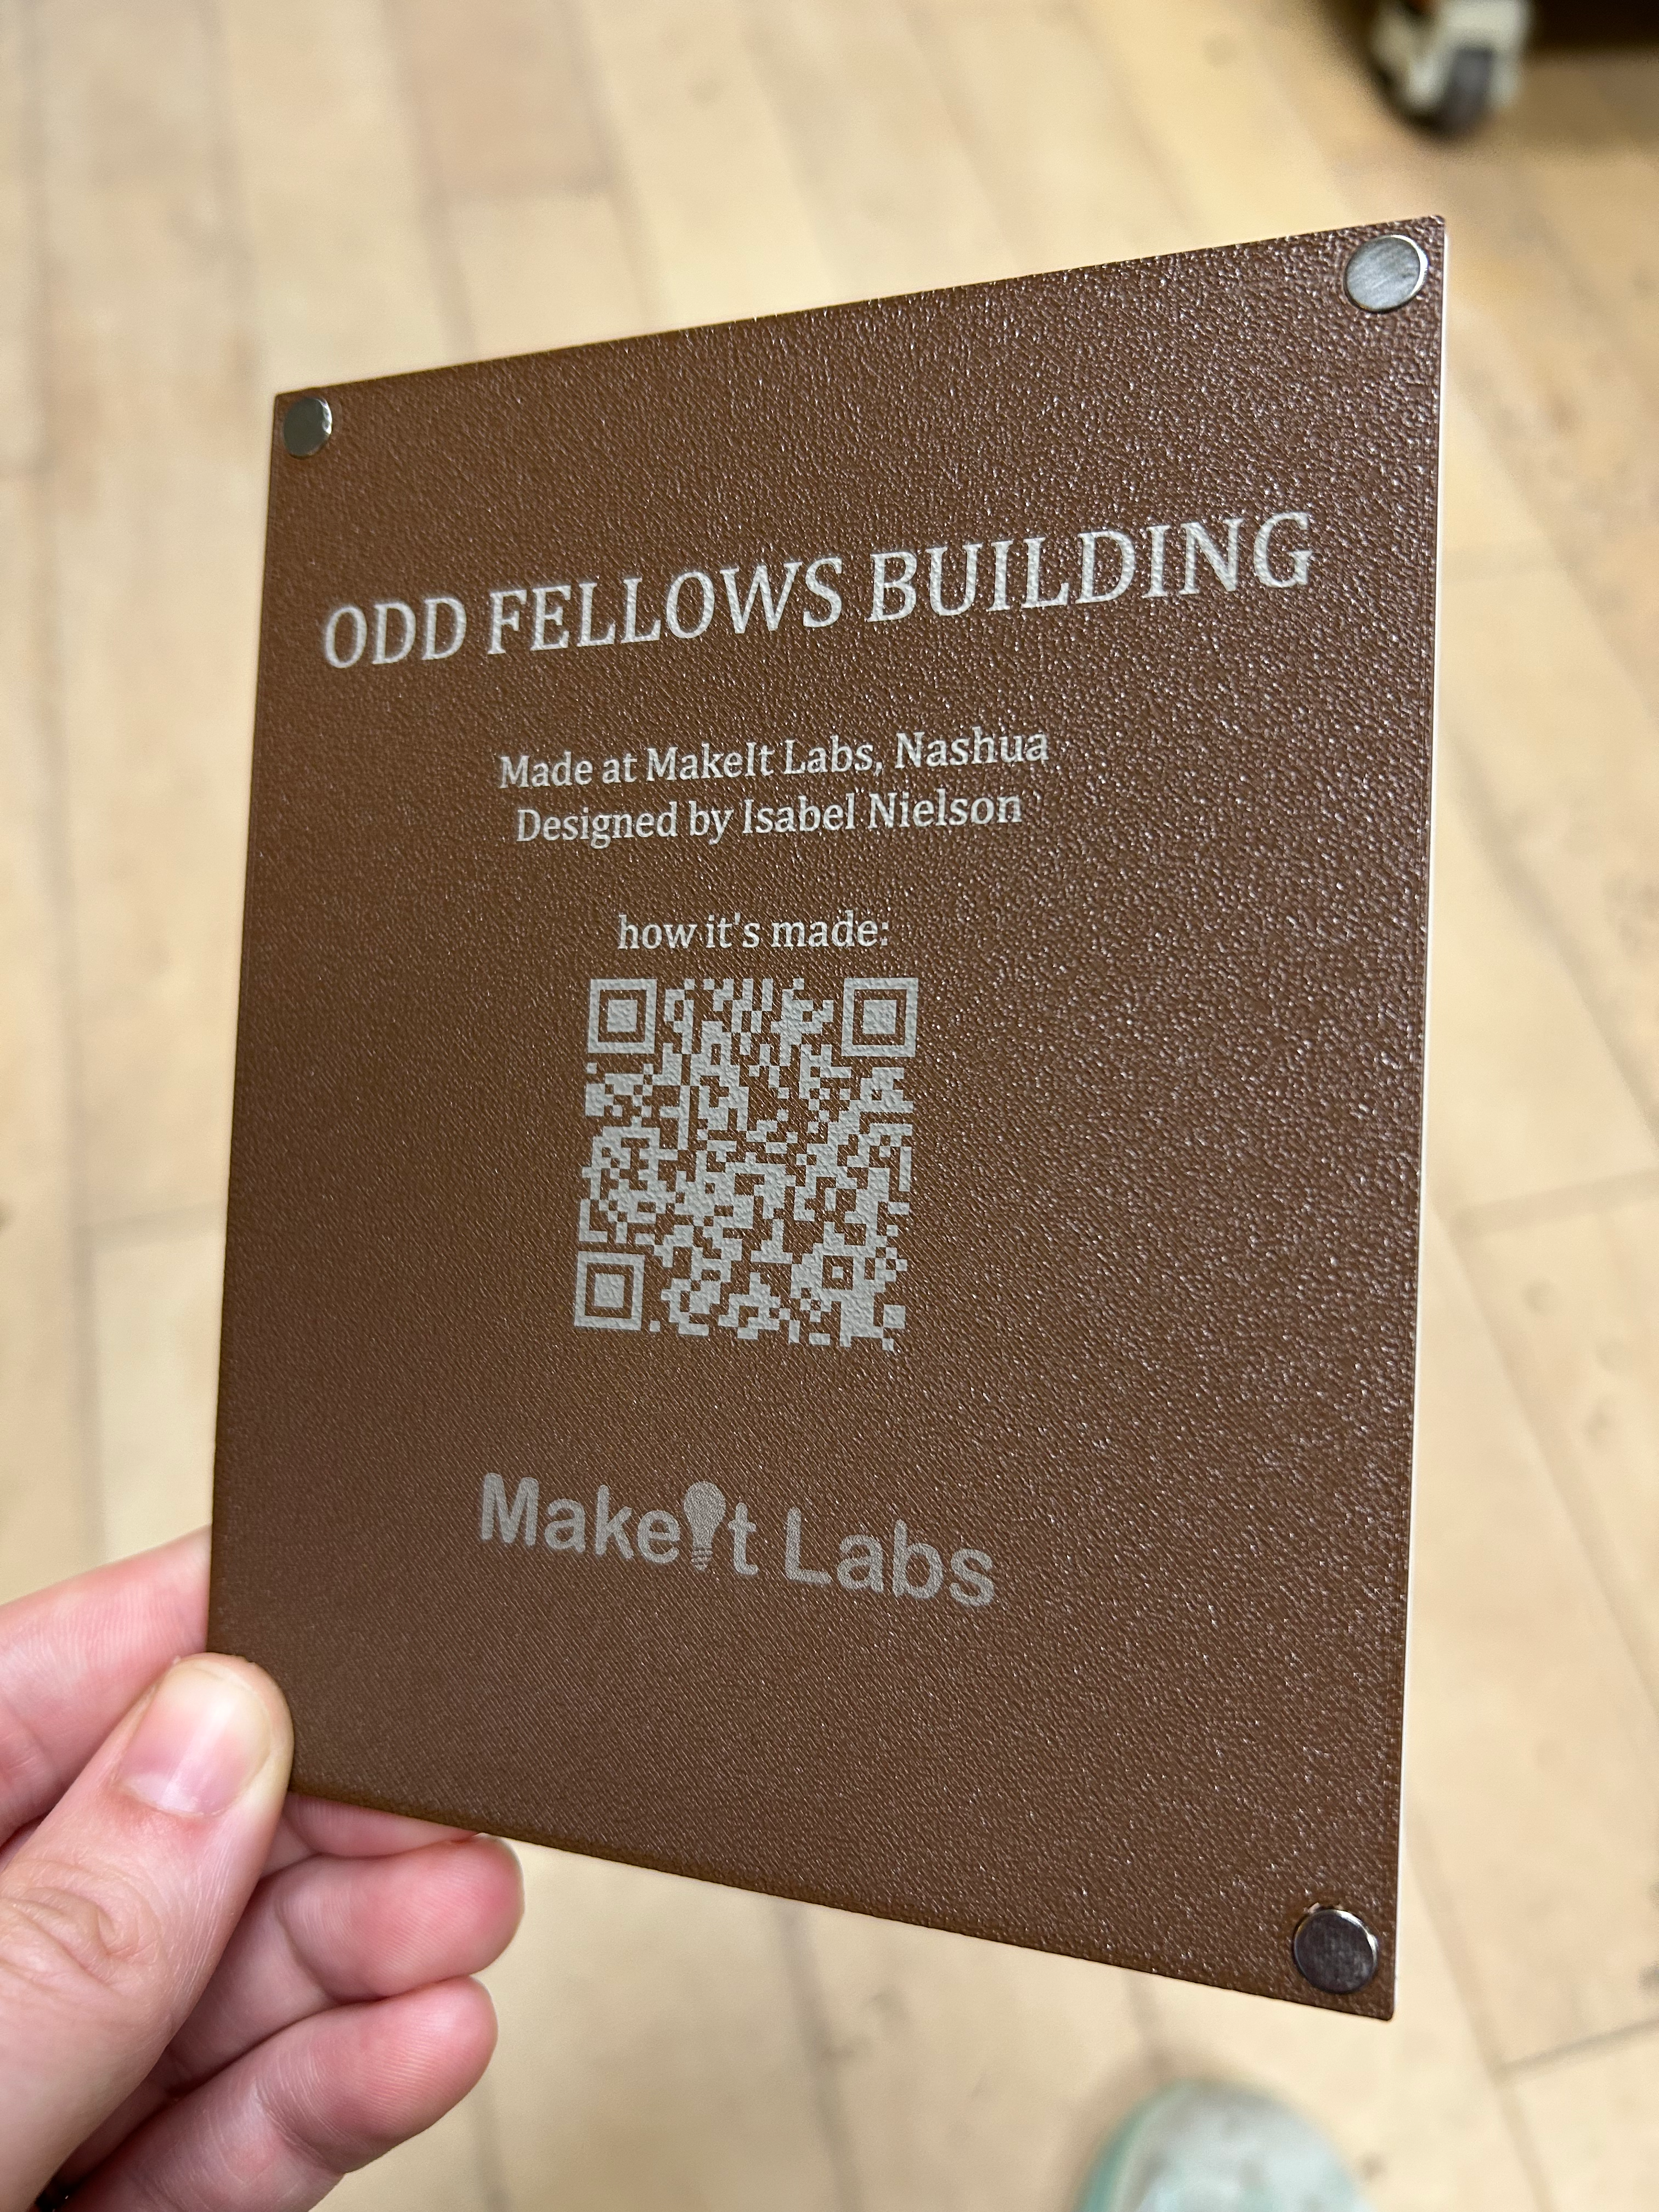
The xTool F2 Ultra is one of several lasers available at MakeIt Labs, and it turned out to be the easiest option for marking the PLA plastic used in these prints. While you can emboss text directly into the bottom of a 3D print, laser engraving generally produces cleaner, more readable results and only takes about one minute per piece. We used it to engrave some basic information on the backs — including a QR code linking to this post. So if you’re reading this, there’s a good chance that’s exactly how you got here!
This was a really fun project to work on, and a good opportunity to get more familiar with some tools I’d only dabbled in before. If you’re curious about trying something similar, most of these tools are either free or cheap, and the MakeIt Labs community was a huge help in figuring out the more hardware-side details. If you want to see the printers and lasers in action yourself, come find us at MakeIt Fest on June 13th!